Recently the MySQL Database Service (MDS) was launched in Oracle Cloud Infrastructure (OCI). As Cloud is about automation you don't have to use the Web Console to configure your instances, but can do it via API, for instance with the oci command line tool or your favorite programming language. However often it is nice to define the world in a declarative way ("I want a network, like this, and a MySQL database like that") and let the tool figure out how to align the reality in the cloud with your wish. A tool doing this is Terraform.
With Terraform you can declare the state in description files, the tool creates a dependency graph and then applies what has to be applied and of course it supports OCI and as part of the default OCI Provider, there is even directly MDS support.
So let's build a set of description files for a cloud environment. I assume you have a tenancy and want to create a new compartment, with it's own VCN and a Compute instance with a client, like MySQL Shell to access the database.
For this configuration create a new empty directory. In there the first thing we need is to tell Terraform that we want to use the OCI provider for accessing OCI. We will come back to it, but for now this will be quite short. Whether we put everything in one file, or split it up and how our files are called doesn't matter for Terraform. It will scan for all files called something.tf and will build it's graph. I like relatively small files, one for each aspect of the configuration, but you are of course free. I start with oci.tf for my general configuration:
provider "oci" {
  version = "~> 3.95"
  region = var.region
}
Here we say that we want at least version 3.95 for the OCI provider and configure our cloud region using a variable. All variables I use, and which can be set or overwritten, I put in a file called variables.tf, where I declare region like this:
variable "region" {}
As said the first thing I want to to create a Compartment. A Compartment in OCI is a grouping of different instances from services you are using. You can use Compartments for instance to group services different departments of your company are using and giving them different resource limits or having development and production systems separated or whatever you might need. By using a compartment here, we won't get in conflict with other services you are already using.
This is my compartment.tf:
resource "oci_identity_compartment" "mds_terraform" {
  name           = "mds_terraform"
  description    = "Compartment to house the MySQL Database and Terraform experiment"
  compartment_id = var.compartment_ocid
  enable_delete = true
}
In the first line we declare that the following is a description of a resource of a type oci_identity_compartment, which inside our other Terraform resources will be called mds_terraform. Then we define the name of the compartment we want to have inside OCI. Here I'm using the same name both times, followed by a description, which might help your colleagues or your later self to understand the purpose. The compartment_id property here refers to the parent, as Compartments can be hierarchical nested. Finally setting the property enable_deleta means that Terraform will try to delete the Compartment, when we tell it to delete things.
As the parent Compartment is a variable again, we need to declare it, thus let's extend variables.tf:
variable "compartment_ocid" {}
With the compartment the first thing we need is our network. This is my vcn.tf:
resource "oci_core_vcn" "mds_terraform_vcn" {
  cidr_block = "10.0.0.0/16"
  dns_label = "mdsterraform"
  compartment_id = oci_identity_compartment.mds_terraform.id
  display_name = "mds_terraform_vcn"
}

resource "oci_core_internet_gateway" "internet_gateway" {
    compartment_id = oci_identity_compartment.mds_terraform.id
    vcn_id = oci_core_vcn.mds_terraform_vcn.id
    display_name = "gateway"
}

resource "oci_core_default_route_table" "default-route-table-options" {
  manage_default_resource_id = oci_core_vcn.mds_terraform_vcn.default_route_table_id

  route_rules {
    network_entity_id = oci_core_internet_gateway.internet_gateway.id
    cidr_block = "0.0.0.0/0"
  }
}

resource "oci_core_subnet" "test_subnet" {
  cidr_block          = "10.0.2.0/24"
  display_name        = "mds_tf_subnet"
  dns_label           = "mdssubnet"
  security_list_ids   = [oci_core_security_list.securitylist1.id]
  compartment_id      = oci_identity_compartment.mds_terraform.id
  vcn_id              = oci_core_vcn.mds_terraform_vcn.id
  route_table_id      = oci_core_vcn.mds_terraform_vcn.default_route_table_id
  dhcp_options_id     = oci_core_vcn.mds_terraform_vcn.default_dhcp_options_id
}

resource "oci_core_security_list" "securitylist1" {
  display_name   = "securitylist1"
  compartment_id = oci_identity_compartment.mds_terraform.id
  vcn_id         = oci_core_vcn.mds_terraform_vcn.id

  egress_security_rules {
    protocol    = "all"
    destination = "0.0.0.0/0"
  }

  ingress_security_rules {
    protocol = "6"
    source   = "0.0.0.0/0"

    tcp_options {
      min = 22
      max = 22
    }
  }

  ingress_security_rules {
    protocol = "6"
    source   = "0.0.0.0/0"

    tcp_options {
      min = 3306
      max = 3306
    }
  }

  ingress_security_rules {
    protocol = "6"
    source   = "0.0.0.0/0"

    tcp_options {
      min = 33060
      max = 33060
    }
  }
}
This is quite a lot and I won't go through all things here, but this declares a VCN with a single subnet, adds an internet gateway, so that we can export services to the internet and can reach the internet from our VCN and sets ingress and egress firewall rules, to only allow traffic to MDS (ports 3306 and 33060) and SSH (port 22). What you might notice is how we are referring to the id of the Compartment we created before, by using oci_identity_compartment.mds_terraform.id and how the different network resources refer to each other in similar ways.
Now it's time to create our MDS instance! Here is my mysql.tf:
data "oci_mysql_mysql_configurations" "shape" {
    compartment_id = oci_identity_compartment.mds_terraform.id
    type = ["DEFAULT"]
    shape_name = var.mysql_shape
}

resource "oci_mysql_mysql_db_system" "mds_terraform" {
    display_name = "Terraform Experiment"
    admin_username = var.mysql_admin_user
    admin_password = var.mysql_admin_password
    shape_name = var.mysql_shape
    configuration_id =data.oci_mysql_mysql_configurations.shape.configurations[0].id
    subnet_id = oci_core_subnet.test_subnet.id
    compartment_id = oci_identity_compartment.mds_terraform.idm.id
    availability_domain = data.oci_identity_availability_domain.ad.name
    data_storage_size_in_gb = var.mysql_data_storage_in_gb
}

output "mysql_url" {
  value =  "mysqlx://${var.mysql_admin_user}:${var.mysql_admin_password}@${oci_mysql_mysql_db_system.mds_terraform.ip_address}:${oci_mysql_mysql_db_system.mds_terraform.port_x}"
}
The actual MySQL Database Instance is declared in the second block, where we give it a name, configure the adminstrative user account, assign the subnet etc. Again we introduced some variables, so let's declare them in variables.tf:
variable "mysql_admin_user" {
    default = "root"
}

variable "mysql_admin_password" {
}

variable "mysql_shape" {
    default = "VM.Standard.E2.1"
}

variable "mysql_data_storage_in_gb" {
    default = 50
}
A few fields might need some extra explanation:
The shape is the machine type we want and defines CPU type, whether we want a VM, memory and so on. Here we default to VM.Standard.E2.1, which is the smallest type and good enough for an experiment. On a production system you probably want to override and use a larger shape.
Then MDS allows you to use different Configurations, so you can tune MySQL Configuration Variables for your application's needs. If you have your custom config you can provide the ID, but I want to use the default for that shape, so I use a data resource to look it up.
In many Cloud Region there are different Availability Domains, different data centers close to each other. The resources we created before span over ADs. However the MDS Instance has to live in a AD. To lookup the AD's ID based on the number of the AD we can put this in oci.tf:
data "oci_identity_availability_domain" "ad" {
  compartment_id = var.compartment_ocid
  ad_number = var.availability_domain
}
And, again, I add another variable to variables.tf.
Now there's one more thing in the mysql.tf: An output block. This will ask Terraform to give us a summary once it is done.
With all these things ready we can execute it! For a start I want to use the Web Console and OCI's Resource Manager. For that I have to package my files, which I do from my command line:
$ zip mds-terraform.zip *.tf
  adding: compartment.tf (deflated 38%)
  adding: mysql.tf (deflated 61%)
  adding: network.tf (deflated 75%)
  adding: oci.tf (deflated 35%)
  adding: variables.tf (deflated 50%)
With that file we can login to the Console, and navigate to the Resource Manager.

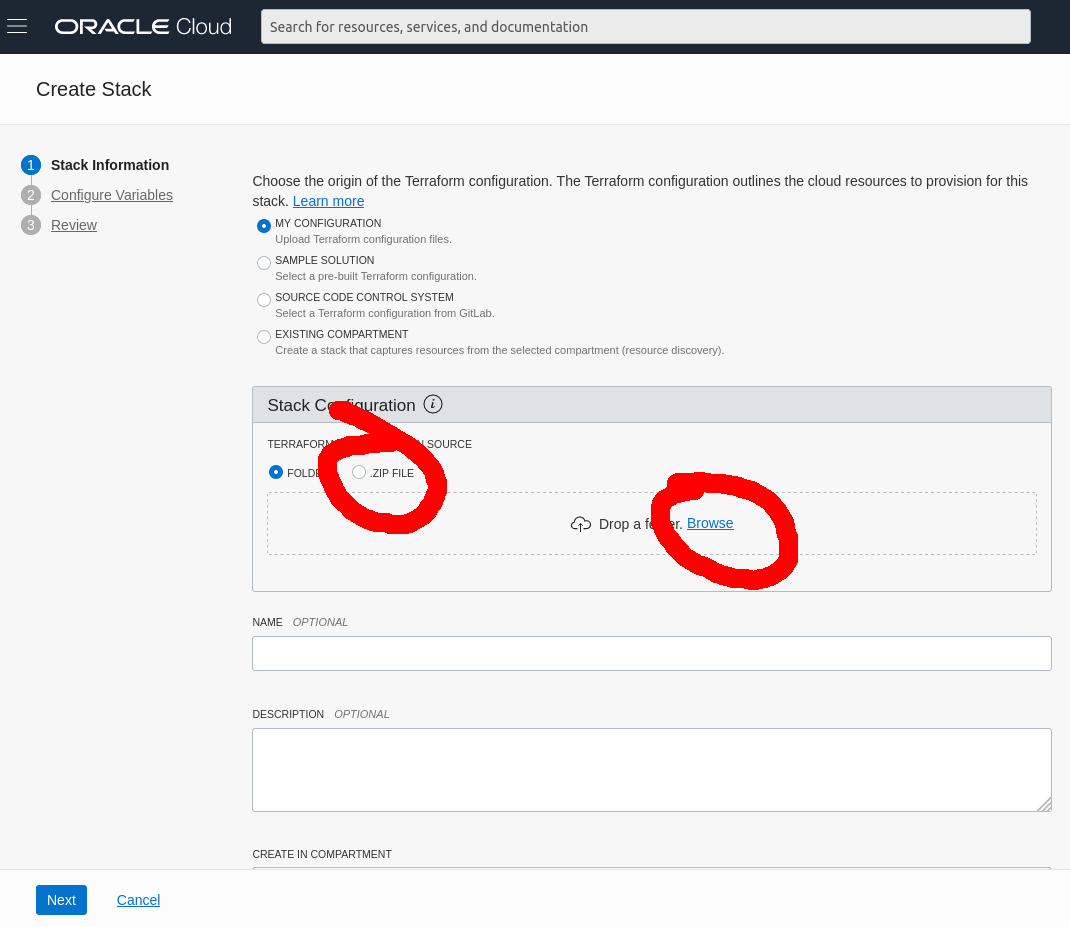
After clicking the "Create Stack" button we can use the checkbox to tell the system that we have zip file and then either drag the file from a file manager or browse for the file.
Now we are being asked to fill the configuration variables we defined previously. No surprise is that our defaults are pre-filled, however the system also identified your region and Compartment ID! The Compartment ID suggested is the one which was used to create the Stack, which probably is the root aka. the tenancy's ID.
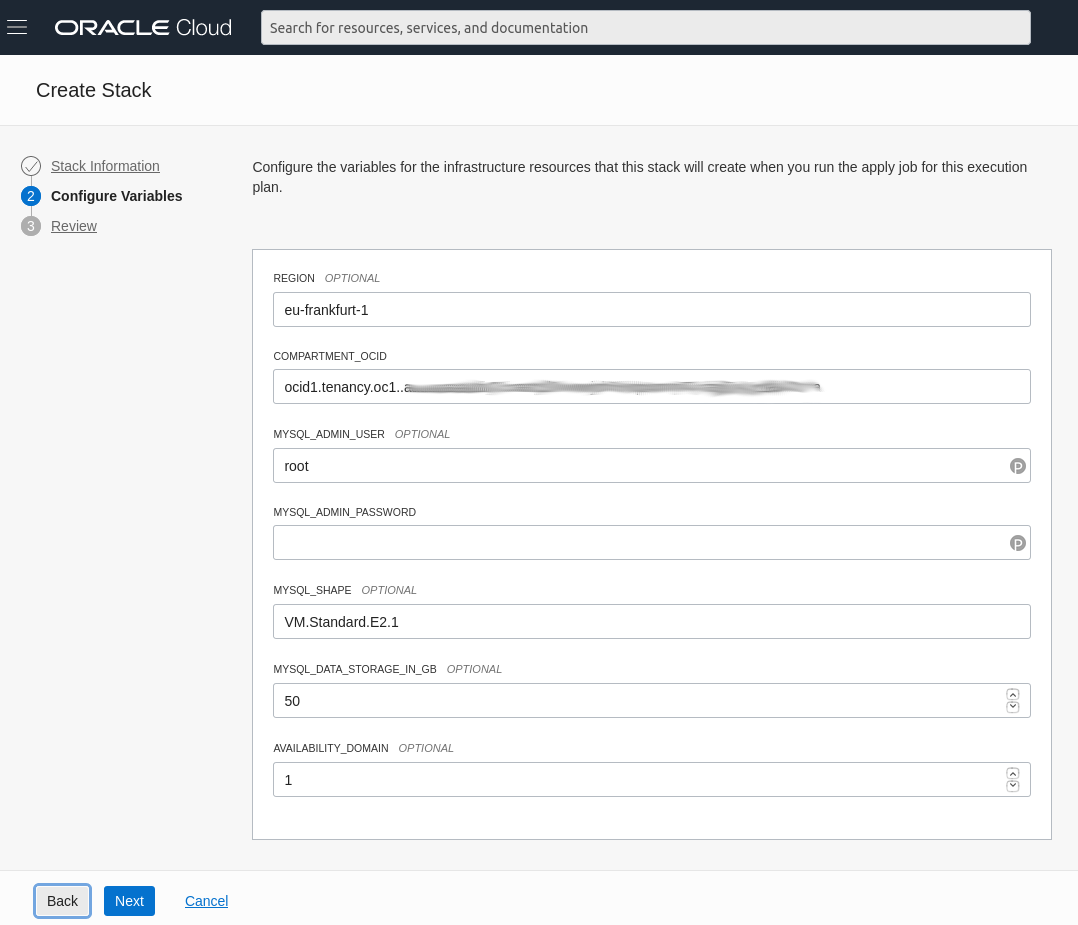
Now you could pick a password for the MySQL user and continue. However MDS has specific requirements on the password security and we would eventually fail later, so let's take a quick side tour and make this form a bit nicer. This can be done by providing a schema.yml file:
title: "MySQL Terraform Experiment"
description: "An experimental Terraform setup to create MySQL Database Service Instances"
schemaVersion: 1.1.0
version: "20190304"
locale: "en"

groupings:
  - title: "Basic Hidden"
    visible: false
    variables:
    - compartment_ocid
    - tenancy_ocid
    - region

  - title: "General Configuration"
    variables:
    - mysql_admin_user
    - mysql_admin_password

variables:
  compartment_ocid:
    type: oci:identity:compartment:id
    # type: string
    required: true
    title: "Compartment"
    description: "The compartment in which to create compute instance(s)"

  mysql_admin_user:
    type: string
    required: true
    title: "MySQL Admin User"
    description: "Username for MySQL Admin User"
    minLength: 1
    maxLength: 14
    pattern: "^[a-zA-Z][a-zA-Z0-9]+$"

  mysql_admin_password:
    type: string
    required: true
    title: "MySQL Password"
    description: "Password for MySQL Admin User"
    pattern: "^(?=.*[0-9])(?=.*[a-z])(?=.*[A-Z])(?=.*[!@#$%^&*()_+\\-=\\[\\]{};':\\\"\\\\|,.<>\\/?]).{8,32}$"

outputGroups:
  - title: "MySQL Database Service"
    outputs:
      - mysql_url

outputs:
  mysql_url:
    type: string
    title: "MySQL Connection String"
    visible: true
And then packing the zip file again:
$ zip mds-terraform.zip *.tf schema.yaml
updating: compartment.tf (deflated 38%)
updating: mysql.tf (deflated 61%)
updating: network.tf (deflated 75%)
updating: oci.tf (deflated 35%)
updating: variables.tf (deflated 50%)
  adding: schema.yaml (deflated 57%)
In the stack configuration I now blick Back, upload the new file and get a nicer form.
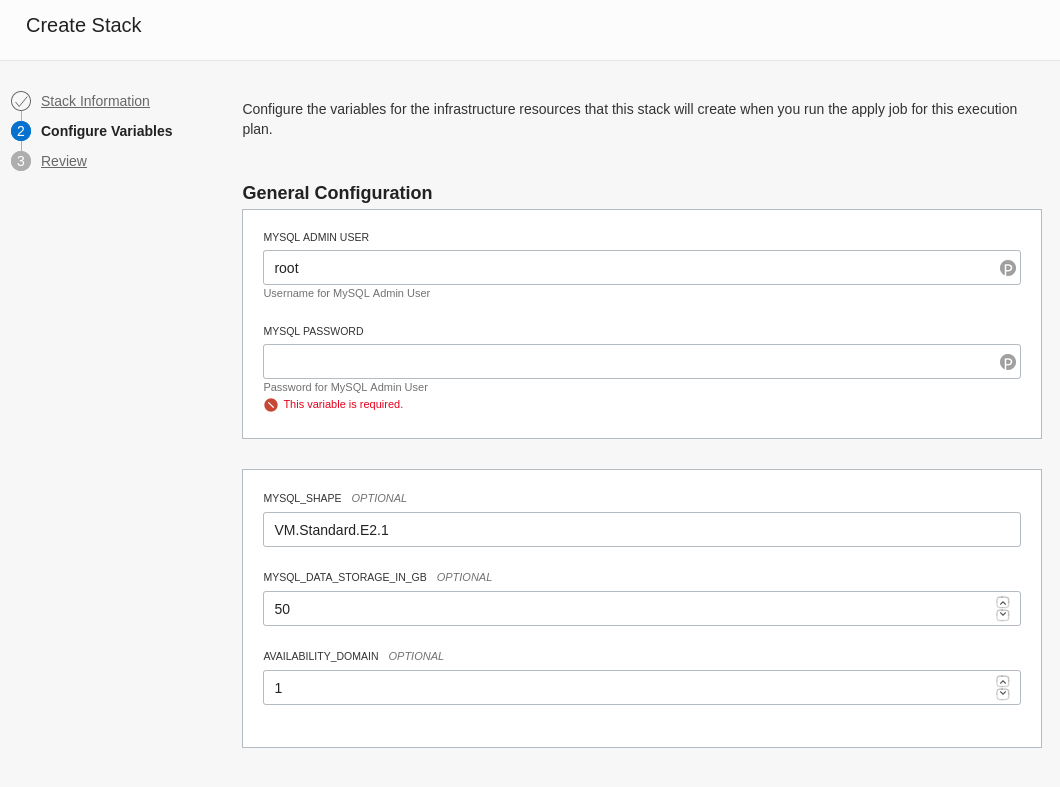
So, let's enter a password and we can continue. (IMPORTANT: The password will be stored insecurely in the stack, for production usage you should secure it)
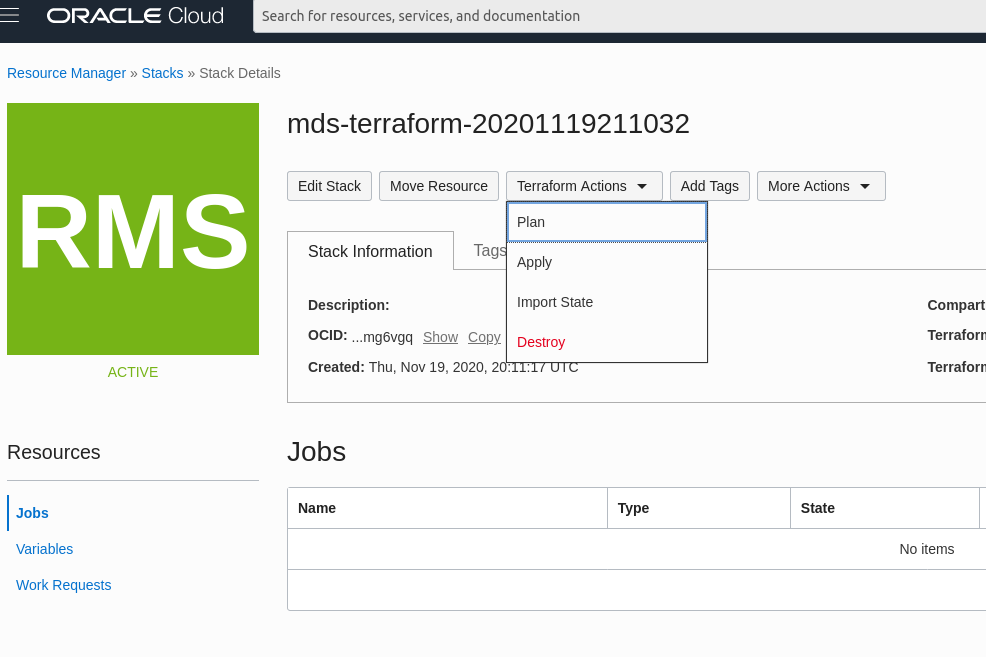
After completing the Wizard I come to an overview page for the Stack and can then pick the Terraform Apply Action. This will take about 15 minutes and create our resources.
After the process is done I browse to the MySQL Database Service page

But oh wait, there is no System in the list!? - Yes, since it is in the newly created compartment, so on the left I can select the mds_terraform Compartment. If it doesn't appear in the list my browser has an outdated version cached and I simply reload the page.
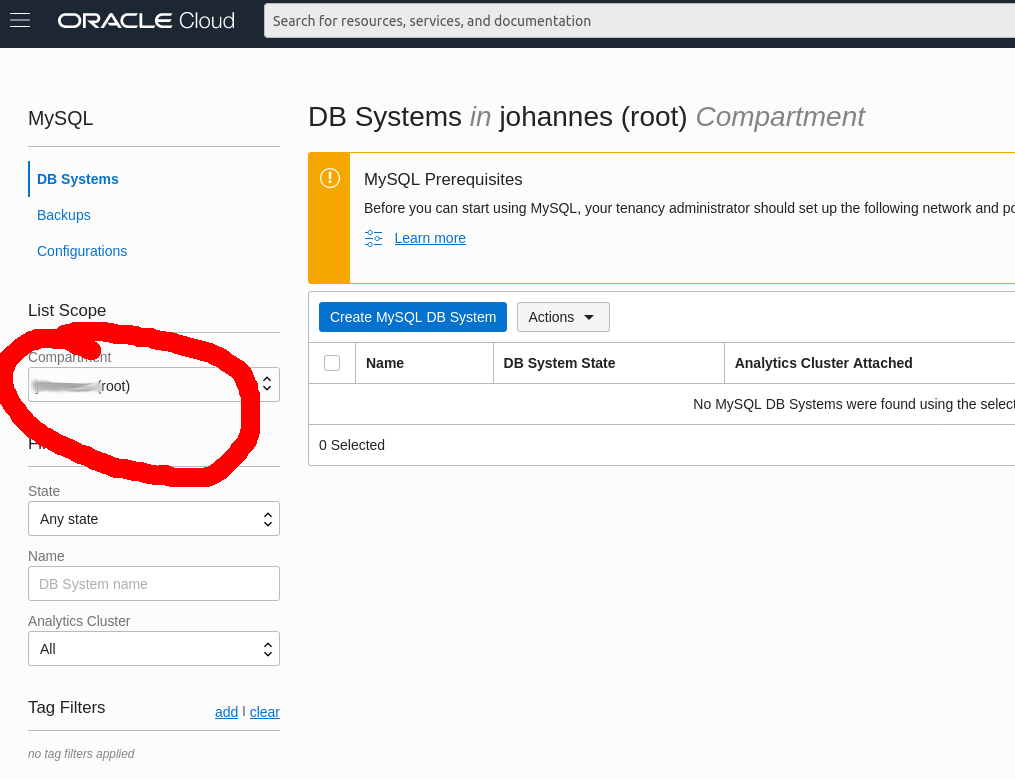
Now we have a MySQL Database Service Database Instance within a VCN and can't reach it. Not so good, so I add one more service to my Terraform configuration: A compute instance with pre-installed MySQL Shell. Here's the compute.tf:
data "oci_core_images" "images_for_shape" {
  compartment_id = oci_identity_compartment.mds_terraform.id
  operating_system = "Oracle Linux"
  operating_system_version = "7.8"
  shape = var.compute_shape
  sort_by = "TIMECREATED"
  sort_order = "DESC"
}

resource "oci_core_instance" "compute_instance" {
  availability_domain = data.oci_identity_availability_domain.ad.name
  compartment_id = oci_identity_compartment.mds_terraform.id
  display_name = "MySQL Database Service and Terraform Test"
  shape = var.compute_shape

  source_details {
    source_type = "image"
    source_id = data.oci_core_images.images_for_shape.images[0].id
  }

  create_vnic_details {
    assign_public_ip = true
    display_name     = "primaryVnic"
    subnet_id        = oci_core_subnet.test_subnet.id
    hostname_label   = "compute"
  }

  metadata = {
    ssh_authorized_keys = var.public_key
    user_data = filebase64("init-scripts/compute-init.sh")
  }
}

output "compute_public_ip" {
  value =  oci_core_instance.compute_instance.public_ip
}
This creates a VM using the latest Oracle Linux 7.8 image and asks for a public IP address, so we can reach it from the outside. I also reference a script called init-scripts/compute-init.sh. This script looks like this and simply installs MySQL Shell from MySQL's yum repository:
#!/bin/sh
cd /tmp
wget https://dev.mysql.com/get/mysql80-community-release-el7-3.noarch.rpm
sudo rpm -i mysql80-community-release-el7-3.noarch.rpm
sudo yum update
sudo yum install -y mysql-shell
In variables.tf a new variable is to be added, which will ask for an SSH public key, so we can login to the machine and a variable to configure the shape with a sensible default:
variable "compute_shape" {
  default ="VM.Standard2.1"
}

variable "public_key" { }
For adding the new configuration field and new output to our form in the Resource Manager schema.yml needs a few minor updates, for simplicity here is the complete file:
title: "MySQL Terraform Experiment"
description: "An experimental Terraform setup to create MySQL Database Service Instances"
schemaVersion: 1.1.0
version: "20190304"
locale: "en"

groupings:
  - title: "Basic Hidden"
    visible: false
    variables:
    - compartment_ocid
    - tenancy_ocid
    - region

  - title: "General Configuration"
    variables:
    - mysql_admin_user
    - mysql_admin_password
    - public_key

variables:
  compartment_ocid:
    type: oci:identity:compartment:id
    # type: string
    required: true
    title: "Compartment"
    description: "The compartment in which to create compute instance(s)"

  mysql_admin_user:
    type: string
    required: true
    title: "MySQL Admin User"
    description: "Username for MySQL Admin User"
    minLength: 1
    maxLength: 14
    pattern: "^[a-zA-Z][a-zA-Z0-9]+$"

  mysql_admin_password:
    type: password
    required: true
    title: "MySQL Password"
    description: "Password for MySQL Admin User"
    pattern: "^(?=.*[0-9])(?=.*[a-z])(?=.*[A-Z])(?=.*[!@#$%^&*()_+\\-=\\[\\]{};':\\\"\\\\|,.<>\\/?]).{8,32}$"

  public_key:
    type: string
    title: "SSH Public Key"
    description: "An OpenSSH public key for accessing your compute instance"

outputGroups:
  - title: "MySQL Database Service"
    outputs:
      - mysql_url

  - title: "Compute Instance"
    outputs:
      - compute_public_ip

outputs:
  mysql_url:
    type: string
    title: "MySQL Connection String"
    visible: true

  compute_public_ip:
    type: string
    title: "Public IP"
    visible: true
Now I can package it up, again:
$ zip mds-terraform.zip *.tf schema.yaml init-scripts/compute-init.sh
updating: compartment.tf (deflated 38%)
updating: mysql.tf (deflated 62%)
updating: network.tf (deflated 76%)
updating: oci.tf (deflated 35%)
updating: variables.tf (deflated 55%)
updating: schema.yaml (deflated 57%)
  adding: compute.tf (deflated 54%)
  adding: init-scripts/compute-init.sh (deflated 39%)
And go back to the resource manager ... oh wait .. list is empty ... hah .. I'm in the wrong Compartment. Once that hurdle is bypassed I can select the Stack I created previously, click Edit and upload the new file. The wizard will now ask for the ssh key, which I copy from my $HOME/.ssh/id_rsa.pub before completing the wizard. then I again pick the Terraform Apply action and can observe how Terraform notices that most things already exist, but only the Compute instance is missing and creates it. A few minutes later it is done and the task completed.
On top of the page a new tab Application Information appeared and based on information from the schema.yml file giving me an mysqlx URL and an IP address. I then use that IP address to connect to the machine, using my ssh key and the usernamne opc. I have to confirm the server identity by typing yes and am on my Compute instance, which is in my VCN. I can then use MySQL Shell with the URL from the Terraform summary to connect to the MySQL instance.
MySQL Shell will by default start in JavaScript mode. If I'm not in mood for that I can type \sql and switch in SQL mode. I can also install other programs as I like, including my own, and connect to the MDS instance just like any other MySQL.
[opc@compute ~]$ mysqlsh 'mysqlx://root:...@10.0.2.5:33060'
MySQL Shell 8.0.22

Copyright (c) 2016, 2020, Oracle and/or its affiliates.
Oracle is a registered trademark of Oracle Corporation and/or its affiliates.
Other names may be trademarks of their respective owners.

Type '\help' or '\?' for help; '\quit' to exit.
WARNING: Using a password on the command line interface can be insecure.
Creating an X protocol session to 'root@10.0.2.5:33060'
Fetching schema names for autocompletion... Press ^C to stop.
Your MySQL connection id is 13 (X protocol)
Server version: 8.0.22-u2-cloud MySQL Enterprise - Cloud
No default schema selected; type \use <schema> to set one.
 MySQL  10.0.2.5:33060+ ssl  JS > \sql
Switching to SQL mode... Commands end with ;
 MySQL  10.0.2.5:33060+ ssl  SQL > CREATE DATABASE foo;
Query OK, 1 row affected (0.0052 sec)
 MySQL  10.0.2.5:33060+ ssl  SQL > use foo
Default schema set to `foo`.
Fetching table and column names from `foo` for auto-completion... Press ^C to stop.
 MySQL  10.0.2.5:33060+ ssl  foo  SQL > CREATE TABLE t (id INT);
Query OK, 0 rows affected (0.0236 sec)
 MySQL  10.0.2.5:33060+ ssl  foo  SQL > INSERT INTO t VALUES (1);
Query OK, 1 row affected (0.0139 sec)
 MySQL  10.0.2.5:33060+ ssl  foo  SQL > SELECT * FROM t;
+----+
| id |
+----+
|  1 |
+----+
1 row in set (0.0007 sec)
Once you are done you can go back to the Web Console and the Stack's page and pick the Terraform Destroy Action and all things will be removed again.
Note: It can happen that the Cloud Init Script didn't finish, yet and MySQL Shell isn't installed. Then wait a few moments and try again. Also you might see an error like mysqlsh: error while loading shared libraries: libpython3.7m.so.1.0: cannot open shared object file: No such file or directory. If that happens logout and back in. If the error persists run export LD_LIBRARY_PATH=/usr/lib/mysqlsh/ mysqlsh as a workaround.
Now didn't I initially say that I want to automate it and not click in a Web Console? - Yeah I did and install the terraform tool locallyby downloading from terraform.io and then changing my oci.tf file. Previously I was inside OCI and could use my Web Session as authentication and gather data. From my local machine I have to configure more. The provider entry now looks like this:
provider "oci" {
  version = "~> 3.95"
  region = var.region
  tenancy_ocid = var.tenancy_ocid
  user_ocid = var.user_ocid
  fingerprint = var.fingerprint
  private_key_path = var.private_key_path
}
There are new variables, so I add them to variables.tf:
variable "user_ocid" {}

variable "fingerprint" {}

variable "private_key_path" {}
Now I can run terraform init, which will read the files and download the oci provider. If I now run terraform apply it will ask me about all those variables. Best way to gather those is by installing the OCI command line tool and running oci setup bootstrap, which will guide you through the process to setup a client and putting relevant information in your $HOME/.oci/config file.
All these files are available on GitHub at https://github.com/johannes/mysql-database-service-terraform-example
Happy MySQLing.
If you want to see how to use a similar setup for running a serverless application using Node.js on OCI you can look at this Hands-on-Lab and I also suggest reserving some time to attend the Oracle Live event with a big MySQL announcement on December 2nd.